
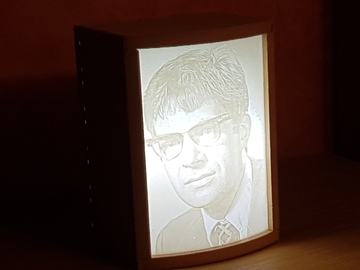
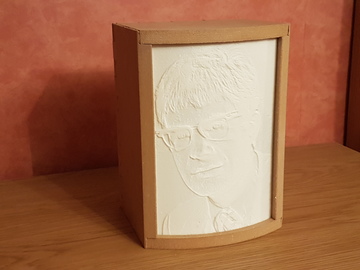
My uncle, Alan Fantom, died in 2018 and I thought it fitting to do a project in his memory. I’d been wanting to experiment with 3D printed lithophanes, and this seemed like the perfect opportunity. We had a good black and white photo of him that we’d used extensively to remember him at his funeral, coincidentally also the photo used in his book, and that was a perfect match for the lithophane printing process.
I was immensely impressed with the results of the lithophane print and decided that to show it to its full potential it would benefit from a custom light box. This was an opportunity to try out a “desktop engraver” that I’d recently bought - essentially a low cost desktop CNC machine.
Thanks to the superb tool at 3dp.rocks the process of creating the lithophane was pretty straightforward. It takes a JPEG file and a few easily tunable parameters, and generates a STL file suitable for importing into a slicer for 3D printing.
I chose the Outer Curve model, set the maximum size (in this case the height) to 200mm, a mere 10mm short of the top limit of my 3D printer, the thickness at 3mm and the thinnest layer at 0.4mm, and the curve to 60 degrees. The curve would become particularly important as that has to match up with the light box design.
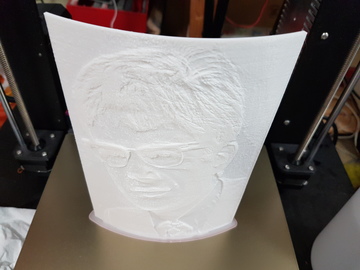
Printing the lithophane was even more straightforward. I used a brim as the contact area with the bed is fairly small, but no other special settings were needed. I sliced the model at a layer height of 0.1mm, and printed it with white PLA. The result was nothing short of phenomenal when held up to the light.
I wanted to create a custom light box which matched the curvature and dimensions of the lithophane, and provided reasonably even illumination while being tidy enough to display indoors. I considered 3D printing a suitable box, and that would have worked, but I thought that wood made a better material for this. I had a CNC “engraver” waiting for my attention, a CNC 2418 which I’d bought from aliexpress and while I’d previously done a test run on a simple engraving toolpath, I’d not yet tried cutting anything more substantial. Nevertheless, I thought this machine should be able to handle it, so I started off building a CAD model of the box.
This was also an opportunity to improve my FreeCAD skills, and this project was a good one to parameterise, especially where the dimensions of the lithophane were concerned, as well as the thickness of the wood stock, as I might want to reuse the basic design at some point. It also pleased me that FreeCAD had grow a workspace for generating CNC toolpaths, as free and open source software for generating toolpaths is a bit thin on the ground.
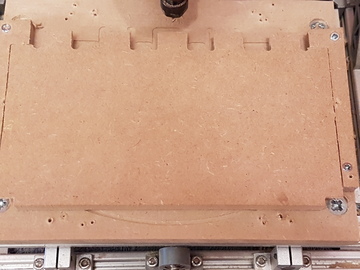
The rear of the box is held together with finger joints. Because an end mill is round it’s not possible to cut an interior right angle, so I chose to accentuate that artefact and create slightly larger holes at those positions for ventilation. The joints between the sides and the top and bottom use blind finger joints, where there is a thin layer of wood covering the joint, to prevent light spilling out and detracting from the visual effect.
There are grooves to hold the lithophane in place, and a hole in the back for the power cable. The front surface is contoured to match the curvature of the lithophane, an effect that is visually pleasing but ultimately more complicated to machine.
I used FreeCAD’s Path workspace to turn the CAD model into a series of toolpaths for the machine to follow. Some of the cuts were fairly straightforward but things got a bit more complicated when it came to the blind finger joints. The Path workspace is still relatively new, and I was finding that I was pushing some of its limits in trying to produce optimal toolpaths. Many thanks to sliptonic, one of the developers of the Path workspace, who was extremely helpful on IRC, thinking and talking through how to achieve what I wanted to.
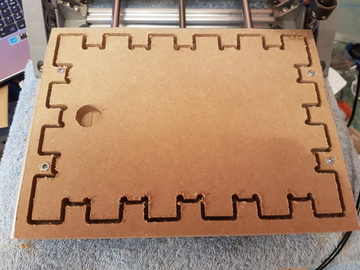
I machined each of the parts out of 12mm thick MDF. The machine has a cutting area of 240mm x 180mm, and the largest part was only slightly smaller than that so careful positioning was needed, but it did all fit. I used screws to hold down the workpiece, and chose their positions so that the cutter would cut around them.
Most of the parts were reasonably straightforward to machine, if somewhat time consuming on an entry-level machine. The sides did present more of a challenge though, as both sides needed machining in order to achieve the curved profile on the front edge. I machined the inner side first, and then machined an alignment holder out of a couple of pieces of scrap wood that were screwed down to each side of the spoilboard. This meant that I could align the side pieces perfectly along the right axis for the contouring operation.
I glued the back, bottom and sides together with PVA. As MDF tends to absorb moisture, I treated all the remaining surfaces to seal them up. For the inside I used a white primer, in order to increase the reflected light reaching the lithophane, and for the rest I used a clear MDF sealer. The top surface was left as a push fit, so as to be removable should the light bulb need changing or any repairs made. After applying the MDF sealer the wood had swelled up a little, so the fit of the lid was tight but not excessive.
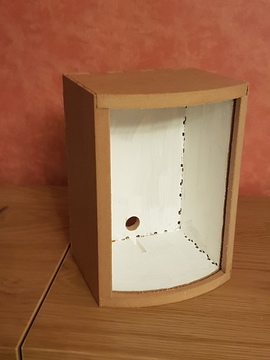
I installed a simple mains lamp holder into the bottom of the box, and fitted a 4 watt LED filament bulb. In order to avoid excessive yellowing from the lithophane, I went for a cold white light.
I felt that this would make a fitting gift to my father, to commemorate the life of his brother, my uncle.
RIP Alan Fantom.